Triple Berry Pie

berrypie

My 6-year-old daughter has been ill. Today it seems she is turning a corner and feeling better, so we are grateful for that. She is already a slender child, but with her fever this week she was unwilling to eat. She dropped 2 pounds and suddenly you can see all of her little bones sticking out. So worrisome (and please know we are on top of the illness and have plenty of doctors on our side). I was offering her any food under the sun. Literally, I said, “I will go to the store and buy you anything you want. I will make you ice cream or cake or beef stew or ANYTHING.” She finally agreed that she could eat raspberries. So we bought two containers… Then last night I finished baking a chocolate cake made with sweet potatoes, eggs, cashew butter, and coconut milk at 10 PM. (I thought that might put some meat on her bones.) (And that recipe will come up on the blog at some point!) This morning I got up at 6:30 AM and made maki rolls- she ate about 5 pieces (not much but a start!)
The recipe for this pie is one I wrote a while back for an Earthbalance contest.
Cherries, cranberries, and blueberries give this pie a special tangy-sweet quality. I stopped making this pie after perfecting the recipe to save myself from gaining ten pounds. I kept sneaking into the refrigerator for “one more bite”. That being said, it would be very nice to make for guests!

Triple Berry Pie Recipe
~~~~~~~~~~~~~~~~~~~~~~~~~~~~~~~~~~~~~~~~~~

CRUST
3/4 cup almond meal, packed
1/2 cup quinoa flakes
3 tablespoons buttery spread or butter
1/4 cup maple syrup
Pinch salt

FILLING
1 1/2 cups pitted black cherries (fresh or frozen)
1 1/2 cups blueberries (fresh or frozen)
1 cup cranberries (fresh or frozen)
1 tablespoon bourbon (optional)
3 tablespoons agave
1/2 tablespoon cornstarch (or arrowroot)

~~~~~~~~~~~~~~~~~~~~~~~~~~~~~~~~~~~~~~~~~~

1) Preheat the oven to 350 degrees F.
2) Generously prepare 4 (4-inch) tart pans or a pie pan with buttery spread.
3) Combine all of the crust ingredients in a mixing bowl.
4) Press the crust mixture into the prepared tart pans. It is sticky, but with a bit of patience it will make a great crust. You can pop it in the freezer for a few minutes if it gets too sticky.
5) Bake the crust for 10-12 minutes until golden. (It also puffs up a bit.)
6) Combine the berries, bourbon, and agave in a sauce pan and simmer on medium heat until the berries start to break down.
7) Create a slurry with the cornstarch and 1 tablespoon of water. Add to the berries and bring the mixture to a boil briefly. Remove from the heat and allow the mixture to cool a bit.
8) Transfer the berry mixture into the prepared pie crusts. Enjoy warm, room temperature, or cooled.

~~~~~~~~~~~~~~~~~~~~~~~~~~~~~~~~~~~~~~~~~~

I am sharing this recipe on Allergy-Free Wednesday,

Chocolate Rootbeer Frosting

rootbeerfrosting
I was in the midst of trying to think of an original recipe. Let me tell you, that is nearly impossible. For example, try to think of a pie flavor. Something that would be edible but you think no one has done it before. Now Google it. It was there right? If not, go write that recipe quick before someone beats you to it! In any event, most “original” recipes are variations on existing recipes. So back to my project; I wanted to write a new recipe for an avocado contest. I came up with lots of ideas- but found most had already been done. Then I thought of Chocolate Root Beer Frosting on Chocolate Brownies. I made it without checking the search engines. It tasted fantastic! Just now I popped it into Google and there was one recipe there… but it was not made at all like mine. Anyways, if you have my cookbook you can easily whip up this recipe.

Hints on Making Chocolate Root Beer Frosting
~~~~~~~~~~~~~~~~~~~~~~~~~~~~~~~~~~~~~~~~~~

BROWNIES- your recipe or from my book on page 127 (omit the walnuts)
CHOCOLATE FROSTING – page 155 (omit the vanilla extract) ADD 3/4 – 1 1/4 teaspoon Root Beer Extract

Serve with:
VANILLA ICE CREAM- page 136

~~~~~~~~~~~~~~~~~~~~~~~~~~~~~~~~~~~~~~~~~~

For the frosting, you need will need to taste as you go, to get the right balance of root beer flavoring. (I use Baldwin’s Extracts for the root beer extract.)

~~~~~~~~~~~~~~~~~~~~~~~~~~~~~~~~~~~~~~~~~~

Most of you know by now that my posts usually contain free recipes. Every now and then, I mention my book instead of giving out new recipes because- it is a great book, I put a lot of work into it, and I hope to sell a few books here and there. Thank you for your support.

Coconut Cashew Sandwich Cookies

Sandwich Cookies

I was playing with a recipe from Gluten-Free Easily, and she (Shirley of course) referred to their “Samoa” taste (as in Girl Scout Cookies). One thing lead to another in my mind and I started thinking of the sandwich cookies that the Girl Scouts sell. Thus these Coconut Cashew Sandwich Cookies came to be. You might read this recipe and feel tempted to add chocolate. (Believe me, I always think of adding chocolate.) I personally encourage you to try them as they are… these are very tasty, not too sweet, cookies.

Cookies

Making them cute… Did I phone it in? I just didn’t have a brilliant idea, so I hand shaped them into … shapes!

Coconut Cashew Sandwich Cookie Recipe
~~~~~~~~~~~~~~~~~~~~~~~~~~~~~~~~~~~~~~~~~~

3/4 cup shredded coconut, unsweetened
2/3 cup almond meal/flour
1 tablespoon coconut flour (*if you omit this the cookies will not have a lovely soft texture)
1/4 teaspoon salt
2 tablespoons coconut sugar (brown sugar for substitution)
1/4 cup honey
2 tablespoons coconut oil, liquid
Cashew butter, for filling – stirred and refrigerated a day in advance so that it is not too soft

~~~~~~~~~~~~~~~~~~~~~~~~~~~~~~~~~~~~~~~~~~

Preheat the oven to 350 F. Toast your coconut shreds until light gold. This goes very fast, I stir them every 1.5 minutes. Set aside.

Prepare a baking sheet with parchment paper.

Sift the almond meal, coconut flour, salt, and coconut sugar, into a mixing bowl. Add honey, oil, and shredded coconut. Combine.

Using your hands, create small balls of dough, set them on the baking sheet and press them flat. Repair any cracks or loose crumbs with your fingers. The cookies will not spread and will stay in the shape you make them.

Bake for 5-9 minutes. You are looking for a slight gold color starting at the edges. Set out on a cooling rack. The cookies will be fragile and should not be moved until they are completely cooled.

Spread cashew butter in between the cookies to make sandwiches.

Note: I really like this best with cashew butter. If you try to use almond butter I think you might want to mixing in a touch of honey.

~~~~~~~~~~~~~~~~~~~~~~~~~~~~~~~~~~~~~~~~~~

I am sharing this recipe on

Grain-Free (Nut-Free) Brownies

brownies2

When I feel a little down I often choose to bake. Baking is exciting for me. The idea that you can pop a batter into the oven and it transforms into something new- like a cake- (or in this case ridiculously good brownies), is so gratifying. Then there’s the down side. A gooey failure, made from expensive ingredients that goes straight into the trash. (That happens when you are messing with baking chemistry sometimes.)

So, a few days before Mother’s day I was feeling a bit low and I decided to make brownies from the leftover baked Hannah Yam in my refrigerator. Without any consideration for baking science I put together this batter that should not work and yet it did! Over the next few days I made three more batches- tested a few theories- and perfected the recipe for Mother’s day.

Brownies
GFE is having a fun little blog post featuring grain-free, nut-free recipes that satisfy a craving for nuts. This recipe is so perfect for that, my mother-in-law even mistook the sweet potatoes for nuts!
These brownies break a blog promise. I claim to be dairy-free and this recipe calls for goat’s milk whey protein powder. But at the bottom of the recipe I offer an alternative, so if you want dairy-free, read that before you start mixing.

Grain-Free Brownie Recipe
~~~~~~~~~~~~~~~~~~~~~~~~~~~~~~~~~~~~~~~~~~

1 cup cooked Hannah Yam ** (baked is best, steamed is OK too), mashed but not completely smooth
1 banana (medium), mashed
1 teaspoon vanilla extract
1/4 cup honey (*not for dairy free version)
3 eggs
1 tablespoon oil/fat (anything is fine, I use coconut)
1 teaspoon apple cider vinegar (to activate the baking soda)
1/2 cup cacao powder
1/4 cup goat’s whey protein powder, unsweetened (cow’s whey will work too- other protein powders? – egg white protein should be fine too) (*not for dairy free version)
1 teaspoon baking soda
pinch of salt

* For dairy-free, replace the honey with 1/4 cup coconut sugar plus 1 tablespoon honey. Omit the protein powder entirely. If you can tolerate the goat’s whey I highly recommend using it.
** Hannah yams are white and have a more mild flavor than orange sweet potatoes. If you can get them, they are preferable. Or the Japanese (white) sweet potatoes would be good too.

~~~~~~~~~~~~~~~~~~~~~~~~~~~~~~~~~~~~~~~~~~

Preheat the oven to 325 degrees.

Prepare a baking dish (8×8 or 9×9) with parchment paper and grease the sides.

In a large mixing bowl, combine all of the ingredients in the order they are listed. Mix together and pour into the prepared baking pan.

Bake for about 40-50 minutes. Less time for gooier brownies, more time for cakey brownies. The brownie will feel firm with a slight give in the center. (Toothpick testing does nothing here.)

~~~~~~~~~~~~~~~~~~~~~~~~~~~~~~~~~~~~~~~~~~

I am sharing this recipe on GFE, Slightly Indulgent Tuesdays, Allergy Free Wednesday,

Chocolate Coated PB Cookie Dough Ice Cream Sandwiches

Creamy, soft, sweet and salty peanut butter cookie dough encapsulated in the crunch of rich chocolate sets the tone for this perfect dessert.

scharffenberger

Crunch through rich chocolate exteriors into creamy peanut butter cookie dough. Extra crunches sneak in with slightly bitter bursts of cacao nibs. The flavor is rounded out with salted peanuts that surround the sandwich… And I could go on and on. Oh my goodness these are so good! So, so, so good.

If you don’t eat peanuts try these with almond butter and toasted almonds. It will be so yummy!

Chocolate Coated PB Cookie Dough Ice Cream Sandwich Recipe
~~~~~~~~~~~~~~~~~~~~~~~~~~~~~~~~~~~~~~~~~~

COOKIE
1 1/2 cup almond meal/flour
2/3 cup creamy peanut butter (lightly salted, 100% peanuts)
1/2 cup raw agave nectar (honey would probably be fine)
2 tablespoons butter or buttery spread
1 teaspoon vanilla extract
2 tablespoons Cacao Nibs

ICE CREAM
1 quart (approximate) Chocolate Ice Cream from my cookbook or purchased chocolate ice cream

TOPPINGS
2 (9.7 oz) 70% Cacao Bittersweet Chocolate Baking Bars or about 19 ounce of any chocolate that you like
1/2 cup salted, roasted peanuts, chopped

~~~~~~~~~~~~~~~~~~~~~~~~~~~~~~~~~~~~~~~~~~

Prepare two sheet pans with parchment paper and make sure they will fit in your freezer.

In a large mixing bowl combine the almond meal, peanut butter, agave, butter, and vanilla extract. Stir to combine then mix in cacao nibs. Chill in the refrigerator until the dough is firm enough to handle.

Scoop one level tablespoon of cookie dough, roll into a ball then flatten onto the prepared sheet pan. Make about 24 cookies then place the sheet pans in the freezer.

Melt the chocolate bars in a double boiler.  There are two ways to coat the cookie dough in chocolate: dip them or paint them (one side at a time). If you plan on dipping the cookies, keep most of them in the freezer and dip only a few at a time (as they soften quickly). After coating both sides of all of the cookies with chocolate, set them in the freezer.

Make sandwiches with the ice cream and cookies. (The ice cream may need to soften a bit in order to form the sandwiches.) Roll the sides in chopped peanuts.

Freeze to set the ice cream, then serve.

~~~~~~~~~~~~~~~~~~~~~~~~~~~~~~~~~~~~~~~~~~

I am sharing this recipe on Allergy-Free Wednesdays, Wellness Weekend, Slightly Indulgent Tuesday,

Everything Cookies and Ice Cream Sandwiches (Vegan)

Everything Cookies

I love “everything” about these Everything Cookies! I had to promise myself I wouldn’t make them again for a month… because… I have difficultly controlling myself around them. I keep sneaking back into the kitchen for “one more”.

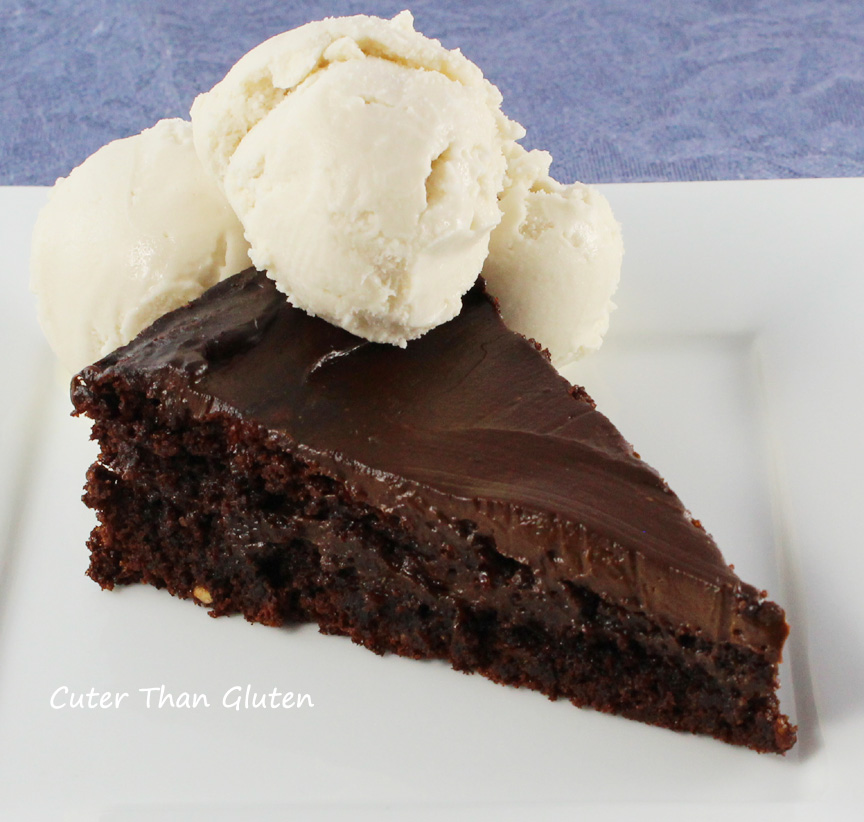
Well, I only waited about a week and then I got the idea to make the cookies into Ice Cream Sandwiches.  I can’t decide which version is more delicious, but I have several ice cream sandwiches calling to me from my freezer so I have plenty of opportunity to try them again.

Everything Cookie Recipe
~~~~~~~~~~~~~~~~~~~~~~~~~~~~~~~~~~~~~~~~~~

2 ripe bananas, mashed
3 tablespoons maple syrup
1/4 cup peanut butter (or any nut butter- or Sunbutter), unsweetened
1 teaspoon vanilla extract
2 tablespoons flaxseed meal
3/4 cup gluten-free rolled oats
1/2 cup quinoa flour
1 teaspoon baking soda
1/4 teaspoon salt
1/2 cup carob chips or chocolate chips (or raisins)
1/2 cup macadamia nuts, chopped (or other nuts or dried cranberries)

~~~~~~~~~~~~~~~~~~~~~~~~~~~~~~~~~~~~~~~~~~

Preheat the oven to 350 degrees F. Prepare two baking sheets with parchment paper.

Mash the bananas in a medium mixing bowl. Stir in the maple syrup, peanut butter, and vanilla.

You can either mix the dry ingredients separately (as you “should”) or you can do less dishes like me and just mix them all in together in one bowl!

Scoop level tablespoons of batter onto the baking sheet. The cookies don’t spread so you can place them fairly close together.

Bake the cookies on the middle rack for about 12 minutes. Check the cookies at 8 minutes, and if the bottoms are already golden, move the baking sheets to the top rack for the last few minutes.

Place the cookies on a cooking rack promptly after removing from the oven.

Makes about 24-30 cookies.

~~~~~~~~~~~~~~~~~~~~~~~~~~~~~~~~~~~~~~~~~~
Ice Cream Sandwiches
~~~~~~~~~~~~~~~~~~~~~~~~~~~~~~~~~~~~~~~~~~

When making the cookies:

* omit the macadamia nuts and carob chips
* spread the scoops of batter flat before baking (and consider using more batter for each cookie if you want bigger sandwiches)
* after they cool put them in the freezer

Making the Ice Cream

* Make the vanilla ice cream base from my cookbook and add 1/2 cup of peanut butter to the saucepan after adding the other ingredients. Stir thoroughly. You will need to freeze the ice cream for several hours after it is made to get it firm enough for making sandwiches.

OR

* Use a store-bought ice cream and let it get slightly soft for scooping.

Making the Sandwiches

* Assemble sandwiches and roll the edges in chocolate chips or carob chips.
* Freeze for an hour or more until firm. (Although I always let them get a bit soft before I eat them because I like softened ice cream.)

Makes about 10 sandwiches (depending on how big you make them).

~~~~~~~~~~~~~~~~~~~~~~~~~~~~~~~~~~~~~~~~~~

I am sharing this recipe on Whole Food Fridays, Allergy Free Wednesdays, Wellness Weekend,