Grain-Free Chocolate Cake

spunkycakeKelly, from The Spunky Coconut, has a great white chocolate pie recipe. I have made it too many times (you know- as in eating too many treats). I came up with some fun modifications and ways to make it cute that I want to share with you. Plus I created a new cake base and I now call Kelly’s recipe “white chocolate frosting” instead of “pie”.

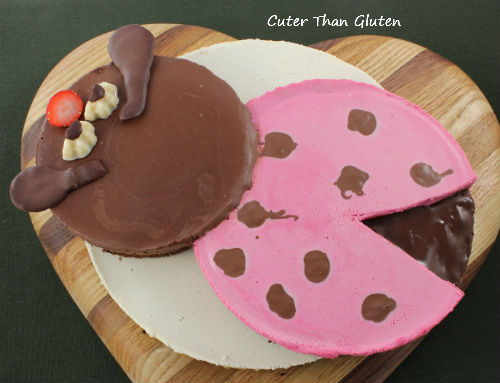
Above I cooked my cake base as a three tiered cake. Then I took Kelly’s recipe and split it into three parts: white chocolate (standard), pink chocolate (standard plus beet juice- can’t taste a difference), and dark chocolate.

spunkycake2
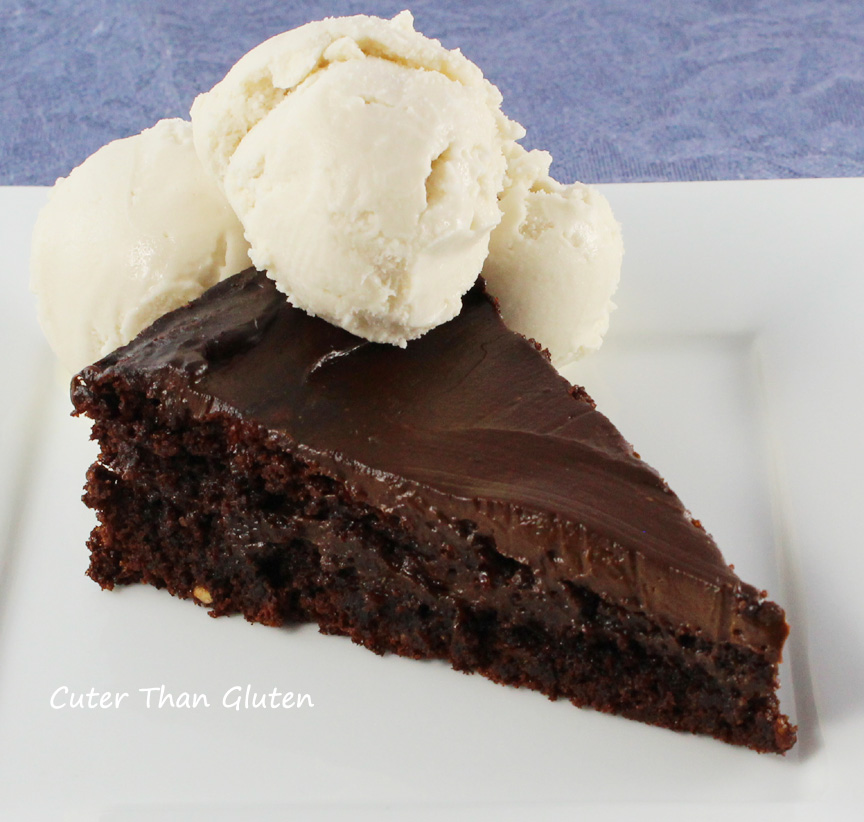
Another time I split Kelly’s recipe and added peanut butter to part, and chocolate to another part and made a swirl by pouring all the white in first, then drizzling the dark over the top.

spunkycake3

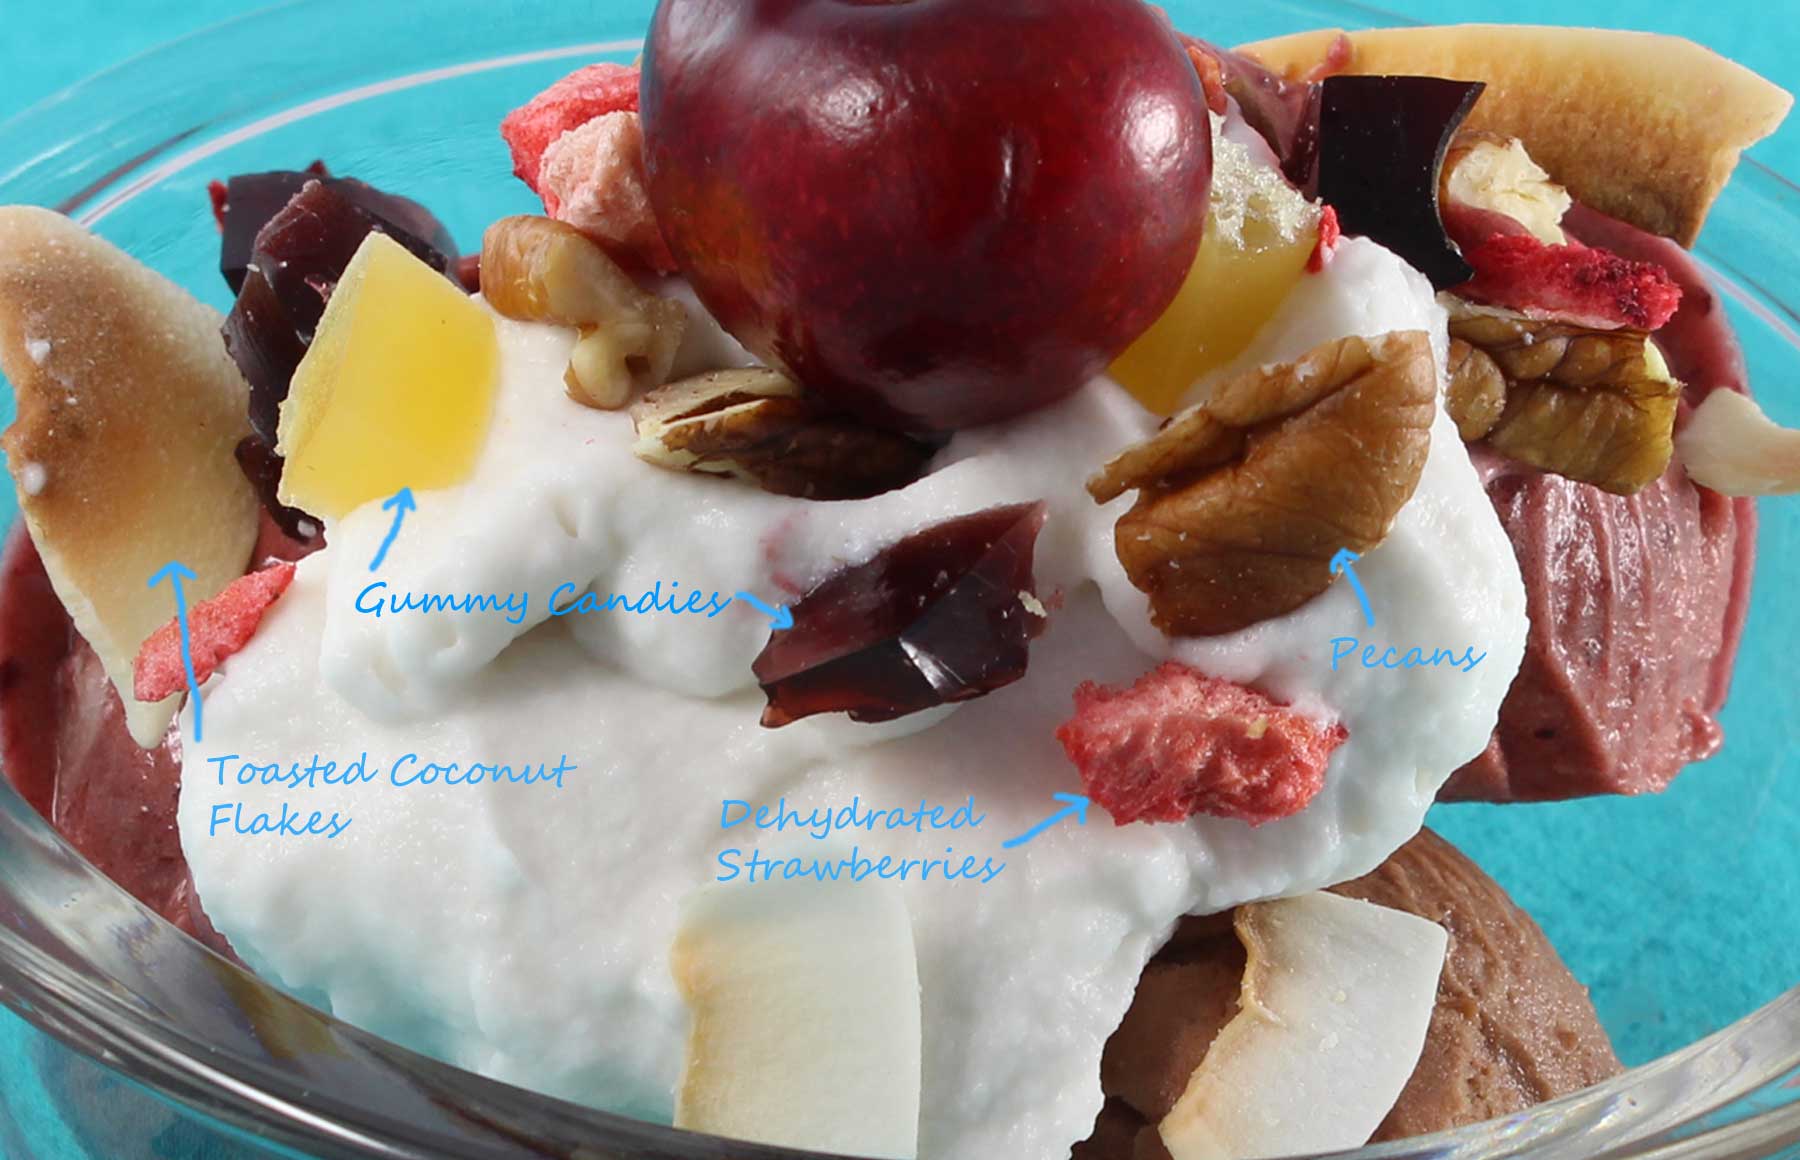
And another time… I made mini cakes in tart pans and let three lucky girls decorate three cakes with homemade gummies, chocolates, homemade pink frosting, and cereal.

ladybug5

So here is what my cake looks like up close.

Frosting Recipes
~~~~~~~~~~~~~~~~~~~~~~~~~~~~~~~~~~~~~~~~~~

Notes on Kelly’s recipe:
1) It works perfectly as written.
2) I prefer the white without vanilla extract.
3) I find it works a bit better to “bloom” the gelatin before adding it to the mixture. Just soak the gelatin in a couple of tablespoons of cold water. (I learned this watching Master Chef).
4) I don’t bother melting the cacao butter separately- I just toss it in after the heat is off, then blend it all together.

Peanut Butter White Chocolate: The Spunky Coconut Recipe plus… 1/4 cup of peanut butter or more to taste (I like it with salted peanut butter).

Dark Chocolate: The Spunky Coconut Recipe minus 2-3 ounces cacao butter… plus… 2 ounces baker’s chocolate (I use Ghirardelli) This can be a bit “un-sweet” so you may want to add a bit of honey (but I don’t).

Pink: The Spunky Coconut Recipe plus… a few tablespoons of beet juice. (I put beet peels in a pot with about a 1/4+ cup of water, boil it, then strain it.)

Grain-Free Chocolate Cake Recipe
~~~~~~~~~~~~~~~~~~~~~~~~~~~~~~~~~~~~~~~~~~

1 1/2 cups mashed Hannah Yams (sweet potatoes are not the same but they can work)
1/4 cup sunbutter
2 eggs
1/3 cup honey
1/2 teaspoon apple cider vinegar
1 teaspoon vanilla extract
1/4 cup egg white (protein powder)
1/4 cup cacao powder
1/4 teaspoon salt
1/2 teaspoon baking soda
3 tablespoons cacao nibs

~~~~~~~~~~~~~~~~~~~~~~~~~~~~~~~~~~~~~~~~~~

Preheat the oven to 350 degrees F. Prepare a cake pan or pans with parchment paper and oil the sides. You can use an 8 or 9-inch cake pan. Use smaller or bigger pans depending on the design plan. Remember to leave room for the frosting (a pan with tall sides).

Combine all of the ingredients in a mixing bowl.

Smooth the batter in the pan.

Bake for 20-35 minutes. The time will depend on the size of the pan. The cake is done when it is spongy to the touch in the center of the cake and the sides are looking done.

Allow the cake to cool. Loosen it from the pan, then put it back into the pan. Pour the frosting on top and allow the frosting to fully set in the refrigerator. Run a knife around the edges and carefully tip the cake out of the pan.

~~~~~~~~~~~~~~~~~~~~~~~~~~~~~~~~~~~~~~~~~~

I am sharing this recipe on Allergy Free Wednesdays,

Fruit Sundaes

 bananasundae
The idea: to create a delicious dessert without any sweetening other than whole fruits. No concentrated fruit juice, no stevia;  just whole food ingredients.
The Banana Ice Cream was the launching point. This recipe has already made its rounds on other blogs, certainly not my original creation. But I am re-sharing it because everyone deserves to know exactly how to make this sundae.
The other stuff… Coconut Whipped Cream- use the recipe in my book but omit the sweetener. Deydrated strawberries are from Trader Joes. Unsweetened coconut flakes- I toasted them in the oven. Pecans. A cherry. And homemade fruit juice gummies. There are recipes online but I hope to post a good recipe for that soon.
bananasundae5
This sundae got rave reviews and everyone (including people who eat typical ice cream) said it was sweet enough and very creamy.

Banana Ice Cream Recipe
~~~~~~~~~~~~~~~~~~~~~~~~~~~~~~~~~~~~~~~~~~

1 banana per person
cacao powder (for chocolate)
Frozen cherries (for cherry ice cream)

~~~~~~~~~~~~~~~~~~~~~~~~~~~~~~~~~~~~~~~~~~

Chop up the bananas and set them out on a tray in the freezer. Once the bananas are frozen you can make your ice cream. You need a food processor- a blender will not work.

Put the bananas in the food processor with cherries or cacao (or both- my favorite!). Use a ratio of about 3 cups to 1 cup (bananas to cherries). As for the cacao, add to taste but I do about 1 tablespoon per 2 bananas.

Process until the whole thing comes together as an ice cream- soft serve almost. It takes a bit of shoving around so don’t be discouraged if it feels like it isn’t working. Also don’t over process or it will get slimy. You can put it in the freezer for a bit before serving but I don’t like it to be fully refrozen.

~~~~~~~~~~~~~~~~~~~~~~~~~~~~~~~~~~~~~~~~~~

I am sharing this recipe on

Chocolate Rootbeer Frosting

rootbeerfrosting
I was in the midst of trying to think of an original recipe. Let me tell you, that is nearly impossible. For example, try to think of a pie flavor. Something that would be edible but you think no one has done it before. Now Google it. It was there right? If not, go write that recipe quick before someone beats you to it! In any event, most “original” recipes are variations on existing recipes. So back to my project; I wanted to write a new recipe for an avocado contest. I came up with lots of ideas- but found most had already been done. Then I thought of Chocolate Root Beer Frosting on Chocolate Brownies. I made it without checking the search engines. It tasted fantastic! Just now I popped it into Google and there was one recipe there… but it was not made at all like mine. Anyways, if you have my cookbook you can easily whip up this recipe.

Hints on Making Chocolate Root Beer Frosting
~~~~~~~~~~~~~~~~~~~~~~~~~~~~~~~~~~~~~~~~~~

BROWNIES- your recipe or from my book on page 127 (omit the walnuts)
CHOCOLATE FROSTING – page 155 (omit the vanilla extract) ADD 3/4 – 1 1/4 teaspoon Root Beer Extract

Serve with:
VANILLA ICE CREAM- page 136

~~~~~~~~~~~~~~~~~~~~~~~~~~~~~~~~~~~~~~~~~~

For the frosting, you need will need to taste as you go, to get the right balance of root beer flavoring. (I use Baldwin’s Extracts for the root beer extract.)

~~~~~~~~~~~~~~~~~~~~~~~~~~~~~~~~~~~~~~~~~~

Most of you know by now that my posts usually contain free recipes. Every now and then, I mention my book instead of giving out new recipes because- it is a great book, I put a lot of work into it, and I hope to sell a few books here and there. Thank you for your support.

Coconut Cashew Sandwich Cookies

Sandwich Cookies

I was playing with a recipe from Gluten-Free Easily, and she (Shirley of course) referred to their “Samoa” taste (as in Girl Scout Cookies). One thing lead to another in my mind and I started thinking of the sandwich cookies that the Girl Scouts sell. Thus these Coconut Cashew Sandwich Cookies came to be. You might read this recipe and feel tempted to add chocolate. (Believe me, I always think of adding chocolate.) I personally encourage you to try them as they are… these are very tasty, not too sweet, cookies.

Cookies

Making them cute… Did I phone it in? I just didn’t have a brilliant idea, so I hand shaped them into … shapes!

Coconut Cashew Sandwich Cookie Recipe
~~~~~~~~~~~~~~~~~~~~~~~~~~~~~~~~~~~~~~~~~~

3/4 cup shredded coconut, unsweetened
2/3 cup almond meal/flour
1 tablespoon coconut flour (*if you omit this the cookies will not have a lovely soft texture)
1/4 teaspoon salt
2 tablespoons coconut sugar (brown sugar for substitution)
1/4 cup honey
2 tablespoons coconut oil, liquid
Cashew butter, for filling – stirred and refrigerated a day in advance so that it is not too soft

~~~~~~~~~~~~~~~~~~~~~~~~~~~~~~~~~~~~~~~~~~

Preheat the oven to 350 F. Toast your coconut shreds until light gold. This goes very fast, I stir them every 1.5 minutes. Set aside.

Prepare a baking sheet with parchment paper.

Sift the almond meal, coconut flour, salt, and coconut sugar, into a mixing bowl. Add honey, oil, and shredded coconut. Combine.

Using your hands, create small balls of dough, set them on the baking sheet and press them flat. Repair any cracks or loose crumbs with your fingers. The cookies will not spread and will stay in the shape you make them.

Bake for 5-9 minutes. You are looking for a slight gold color starting at the edges. Set out on a cooling rack. The cookies will be fragile and should not be moved until they are completely cooled.

Spread cashew butter in between the cookies to make sandwiches.

Note: I really like this best with cashew butter. If you try to use almond butter I think you might want to mixing in a touch of honey.

~~~~~~~~~~~~~~~~~~~~~~~~~~~~~~~~~~~~~~~~~~

I am sharing this recipe on

Grain-Free Travel Cakes

travelcakes

I really want to participate in a monthly blog sharing called, “Go Ahead Honey, It’s Gluten-Free“, and the due date for the recipe is tomorrow. I have already write the recipe, tested it, and photographed it. That’s not the problem. The problem is this write-up. I need to crop the photo, type in the recipe and publish it. The issue being, I have a concussion! And I feel… not so great. I bonked my head on my husband’s roof rack when borrowing his car. Not fun. The doctor said I would get better when I got better- today is day 4. I already went to the chiropractor and tomorrow I have craniosacral. A few minutes ago I decided chocolate and sugar would make me feel better so I had some Food for Life chocolate chips. FYI: chocolate chips do not mitigate the symptoms of a concussion (I think we all saw that coming).

Back to the bars… They can be cut with cookie cutters…

travelshape

And baked as cupcakes too…

travelcute

So what do they taste like?

Soft and nice like a cake, a bit dense and moist- so they don’t fall apart. Sweet but not really a dessert. I consider them in the snack category rather than a treat, but they aren’t savory.

I realize you might not have egg white protein powder and I really don’t know how to sub for that. I use it a lot in recipes, so if you buy some you will have more opportunities coming up to use it. Rice protein or whey protein may work… or some coconut flour- but none of those ideas have been tested.

So, in my opinion these cakes are delicious and they travel nicely. Here are two variations:

Grain-Free Travel Cakes Recipe
~~~~~~~~~~~~~~~~~~~~~~~~~~~~~~~~~~~~~~~~~~

3/4 cup mashed banana (about 2)- ripe but not too soft
1/2 cup cooked mashed Hannah Yam (white sweet potato, I don’t know how the orange ones would be but most likely fine)
1 egg
1 teaspoon vanilla extract
2 tablespoons sunflower butter (unsweetened)
3 tablespoons egg white protein powder- plain, packed (NOW brand is gluten-free)
1/2 teaspoon baking soda
pinch salt

Variation 1: 2 tablespoons of cacao nibs (and/or other nuts and dried fruit)- add to batter at end
Variation 2: zest of 1 lemon and 1/2 cup freeze dried strawberries – ground into dust- stirred into the batter

~~~~~~~~~~~~~~~~~~~~~~~~~~~~~~~~~~~~~~~~~~

Preheat the oven to 350 degrees F. Prepare an 8×8 or 9×9 baking pan- round or square with parchment paper and grease.

Mix everything together- you know, start at the top of the list and work your way down.

Smooth the batter into the baking pan and bake for about 35 minutes. The top will be gold and still have some give when you touch it. I have found some pans – thin metal- bake faster than ceramic or glass. Just check it at 30 minutes and go from there.

Cool the cake completely before cutting and keep refrigerated after that.

~~~~~~~~~~~~~~~~~~~~~~~~~~~~~~~~~~~~~~~~~~

I am sharing this recipe on Go Ahead Honey It’s Gluten-Free,

Happy Anniversary- Cuter Than Gluten

mothersday

Hey, it’s been a year of gluten-free blogging! Let me know you’re reading and what you would like to see on this blog going forward.

Here’s a little sneak peek at three recipes coming up… a lemon cake, a sundae, and chicken and waffles. I actually have about 13 recipes waiting to be posted, with more in mind to try out!

orangecake   bananasundae   chickenandwaffles

I have enjoyed this year of blogging and I am really looking forward to another year. When I started blogging it was with the purpose of promoting my cookbook. I wasn’t sure whether or not I would enjoy blogging, but it turns out I really do!

I had a ton of fun making food cute.  Sometimes I made bento lunches with the food and sometimes I created an art piece like the “Mango Lassie” below. Making art out of food is so fun for me, I often get really carried away when it comes time for a photo shoot.

Missed some good posts? Click on the photos below to take you to the post.

Rescue Bento   Pumpernickel Bagels   Cherry Ice Cream Pie

Mango Lassie   chili Taco Cone

So where do I go from here?

1) I will let inspiration and the excitement of any given project lead the way.

2) After the posts already waiting in the wings, my blog will most likely be grain-free (there are already many grain-free recipes here, but the transition will take some time, so by fall new posts should be grain-free). I have been eating grain-free since January and will continue with that. What I eat changes as my body and health change. I can’t say for sure what I will eat in the future, but whatever I am eating will be what is on the blog (because why blog about food I don’t eat?)

3) I will continue to blog about fun projects with my kids. Coming up: Strawberry Fest. We will blog about our cultural studies occasionally too.

4) I am considering sharing more personal stories of diet, fitness, parenting, and life. It would just be a sentence here and there, but I haven’t done much of that this past year. Interested?

Thank you for reading and have a wonderful day!

Love, Dawn